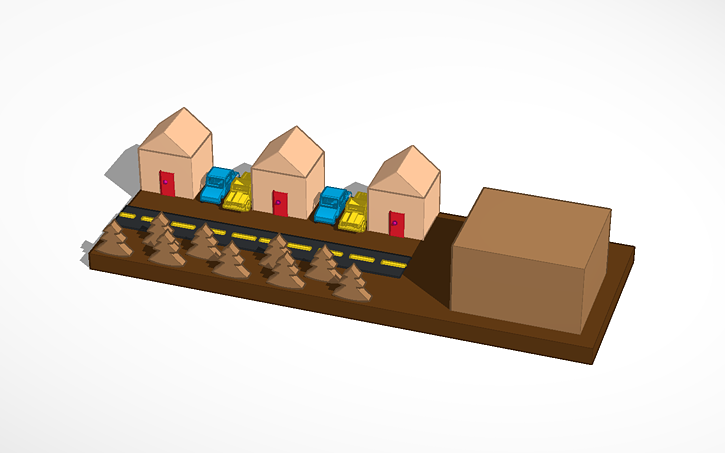
The Mideval Village For Tinkercad project is a fantastic way to translate history into a tangible digital model. In this guide, you’ll find seven practical strategies to build a believable village using simple shapes, smart grouping, and a clear grid system. Whether you’re preparing a classroom demo or a personal diorama, these steps help you stay organized while adding authentic medieval detail.
Key Points
- Plan with a scalable grid to keep proportions consistent as you add more buildings.
- Use modular blocks so you can reuse parts and speed up iterations.
- Keep the color palette and material cues (stone, timber, clay) coherent for realism.
- Prioritize a central feature (keep or walls) to anchor the village layout.
- Details matter: signage, wells, bridges, and market stalls bring the scene to life.
1. Plan a grid-based layout for scalable design
Begin with a simple grid and assign zones for housing, streets, and public spaces. A grid helps you maintain consistent spacing, make duplications clean, and scale the village up without distortion. Use alignment guides in Tinkercad to keep roads straight and buildings evenly spaced, so your Mideval Village For Tinkercad stays cohesive as you add more blocks.
2. Use modular blocks to speed up development
Create a small set of reusable modules—such as a timber-framed house, a stone cottage, and a market stall—and clone them to populate the village. Modular design makes edits easier: move a whole row of houses, adjust road width, or swap out a module without redesigning from scratch. This approach is especially helpful when iterating a Mideval Village For Tinkercad layout.
3. Select authentic materials and color cues
Even with basic shapes, you can imply material variety by color and form. Use stone-gray tones for walls, warm browns for timber framing, and sandy beiges for thatched roofs. Emphasize contrast between stone bases and timber upper stories to evoke medieval construction, which adds depth to your Mideval Village For Tinkercad model.
4. Create a fortified town center with a keep
A central keep or stronghold anchors the village. Build a simple rectangular keep with thick walls, a gatehouse, and a tiled roof. Surround it with a low curtain wall and a few watchtowers to convey defense and status. Position the keep at the heart of your Mideval Village For Tinkercad to give the layout a natural focal point.
5. Design timber-framed houses with simple roofs
Timber framing is iconic in many medieval settings. Build houses with a grid-like façade using thin rectangular frames for exposed timber and solid panels for infill. Add gabled or thatched roofs with slight overhangs to capture the silhouette of a bustling medieval street, enhancing the realism of your Mideval Village For Tinkercad.
6. Add essential village features for character
Introduce practical elements such as a market square, a well, a small bridge over a brook, and narrow alleyways. These features break up the street scenes and provide destinations for your villagers. Thoughtful placement of markets, wells, and bridges enriches the storytelling in your Mideval Village For Tinkercad.
7. Elevate the scene with ambient details
Tiny details bring the village to life. Use signage on shopfronts, variable roof heights, chimneys with subtle smoke, carts along the roads, and trees to add scale and atmosphere. These touches help your Mideval Village For Tinkercad feel lived-in rather than a static collection of shapes.
What scale works best for a Mideval Village For Tinkercad?
+A practical starting point is 1 unit = 1 meter, then define a village footprint (for example 20 by 20 meters) and keep all buildings within that grid. This makes it easier to manage proportions and export for printing if needed.
How can I create realistic timber framing in Tinkercad?
+Represent timber frames with narrow rectangular prisms placed at regular intervals along walls. Use a lighter color for the infill panels to simulate wattle and daub or plaster. Keep the proportions consistent across buildings to preserve architectural rhythm in your Mideval Village For Tinkercad.
Can I export this project for 3D printing?
+Yes. Build with watertight geometry, avoid overlapping faces, and keep walls thick enough for printing if you plan to produce physical models. Export as an STL or OBJ from Tinkercad and verify tolerances in your slicer before printing the Mideval Village For Tinkercad model.
How can I add life to the village without overloading the model?
+Stage the scene by using a few key structures and sparse street furniture rather than filling every inch. Use clusters of trees and a couple of market stalls to suggest activity, while keeping the central areas clear for readability in your Mideval Village For Tinkercad.